If you're encountering an error message stating that the ink cartridge can not be recognized, is an incompatible cartridge, the wrong ink cartridge is installed, or if your printer light has blinking lights, there may be an easy solution to fix the problem. Make sure that the cartridge pictured matches the cartridge you have in your hand or installed in your machine. The compatible ink cartridge model of the printer can be seen by opening the cover of the printer . Confirm that the printer you are using is listed in the printer compatibility table as a compatible printer for the cartridge you are trying to install. If One of these Two criteria do Not match, you have most likely received the incorrect ink cartridge for the printer. Please visit our Printer Compatibility page to determine what cartridge you need for your printer. After confirming that you have the correct cartridge for your printer, open the printer cover and remove the ink cartridge. After removing the cartridge, you will need to locate the copper contacts (Figure 1).
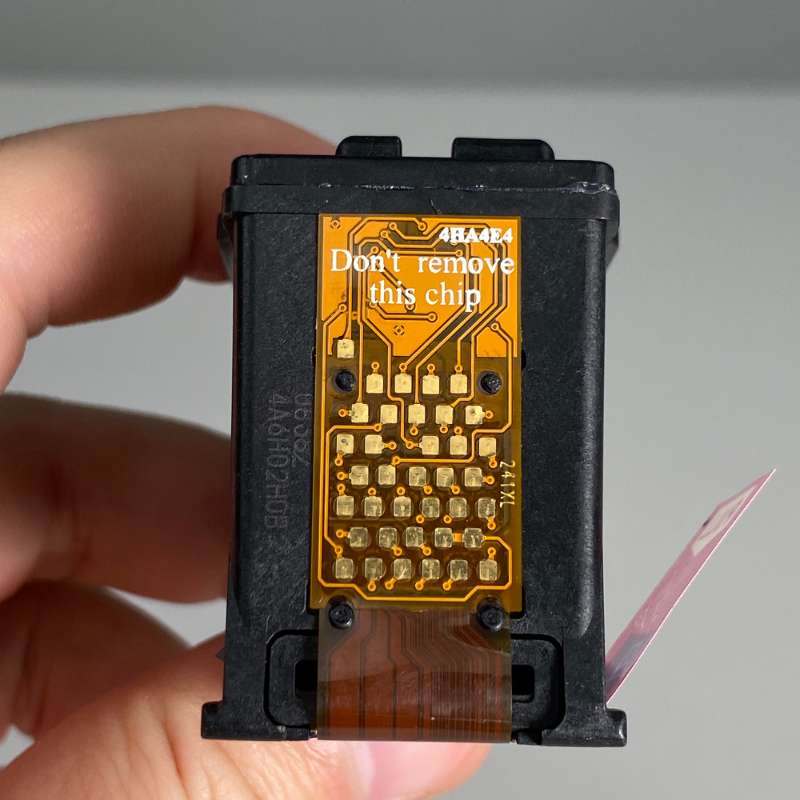
If the copper strip is missing, the cartridge will not work and will need to be replaced. If the copper strip is intact, you may need to clean the contacts from any kind of obstruction or debris as this could be the cause of the error. You can use a pencil eraser to clean the copper contacts. Brush the copper strip lightly with the eraser to remove any potential obstruction or debris. Or you can use any type of lint free cloth or a coffee filter to gently wipe the copper strip, again to remove any type of obstruction or debris. When all these done, replace the cartridge in the cradle, close the lid, and follow any prompts that may appear on the screen. If the problem persists after you put the cartridge back in the cradle, you need to reset the printer. This can be solved by turning off the computer and the printer with the cartridge installed. Unplug your printer and leave it off for 2 minutes. Restart the printer and computer, and try printing again. If you have tried both steps and got the same error, there is most likely an electrical problem with the cartridge and you should return the cartridge to where you purchased it. If you need to print right away and this troubleshooting did not resolve your ink cartridge problem, select the option entitled "One Cartridge Printing".
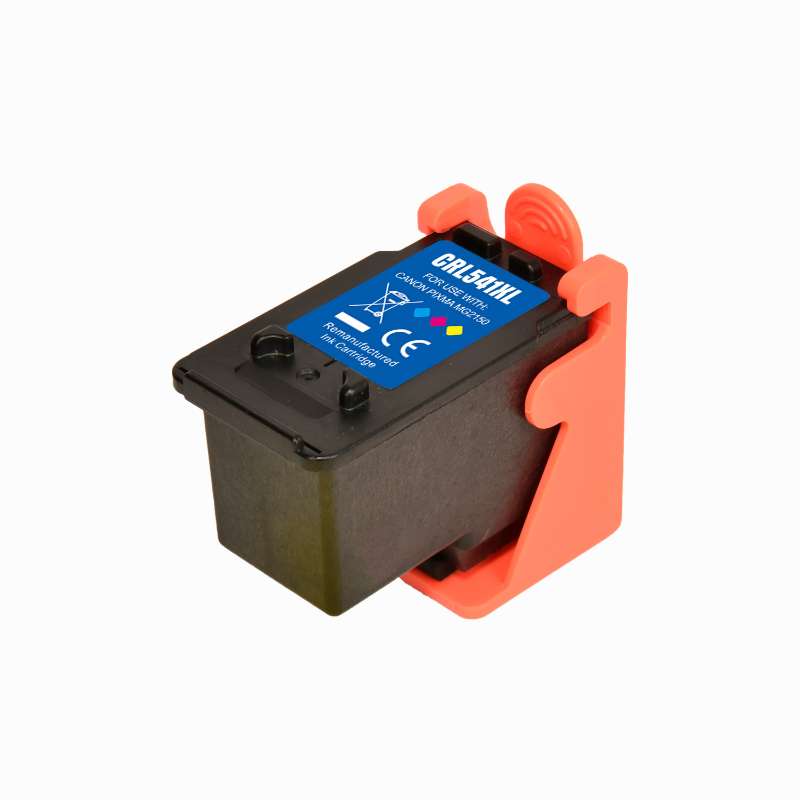
Some remanufactured cartridges come with a clip (Figure 1)

that protects the printhead and helps to preserve and maintain the quality of the cartridge. To remove this clip, please place the cartridge on a sturdy surface. Holding the clip with one hand, press down on the cartridge with the other hand and pull back on the clip. Some resistance is normal, so don't be alarmed. You may find some residual ink on the pad or some ink on the printhead of the cartridge. This is also normal, you can discard the removed protective cover. After removing the clip, you can install the cartridge in the printer as usual. If you need to print immediately and this troubleshooting did not resolve your ink cartridge problem, please select the option entitled "One Cartridge Printing".
If you have printed a document but are not satisfied with the print quality, you may need to perform a cleaning cycle to improve the print quality. You can clean through the control panel on your printer, if your printer does not have a control panel, select the "Perform a cleaning cycle from your computer" troubleshooting for further assistance. Please be awear that this process may vary by printer, and you can also check the printer's user manual for instructions on performing a cleaning cycle. Press the Menu button on the printer. Scroll to "Tools" and press "OK". Scroll to "Clean Printhead" and press "OK". After the cycle is complete, your printer will print a test page. If the quality of the test page is satisfactory, press "OK" to exit the cleaning cycle. You may return to the document you wish to print and resume printing. You may also perform another cleaning cycle if you are not satisfied with your test page. Please be aware that cleaning the printhead does consume ink;and therefore, it should only be done when necessary. If the test page is satisfactory, you can go back to the document you want to print and continue printing. If the test page is not satisfactory after the cleaning cycles, The next step is to try blotting the cartridge to make sure that the printhead nozzles are not clogged with dry ink. We recommend that you use a lint free cloth and place a paper towel or other absorbent material under the lint free cloth to protect your surface from the ink, which may stain your underlying surface. Remove the cartridge from the printer. Find the printhead. It's on the bottom of the cartridge. Do not touch the printhead or bottom of the cartridge, as this can damage the cartridge. Hold the ink cartridge with the printhead facing downward. Just press the printhead of the cartridge onto the lint free towel and hold for 3 seconds. After you lift the ink cartridge up, a smear should appear on the lint free cloth (Figure 1).
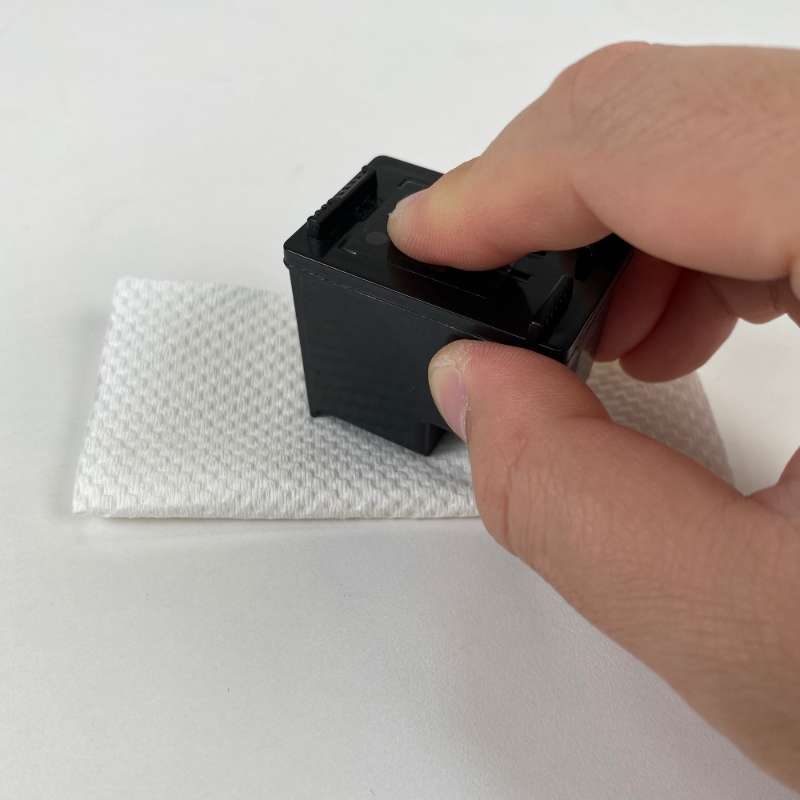
If you do get a good blot on the cloth, reinstall the cartridge and try printing again. If your cartridge does not provide a good blot, the ink may be completely depleted and you should replace your cartridge. If you need to print right away and this troubleshooting did not solve the problem with your cartridge, please select the option entitled "One Cartridge Printing".
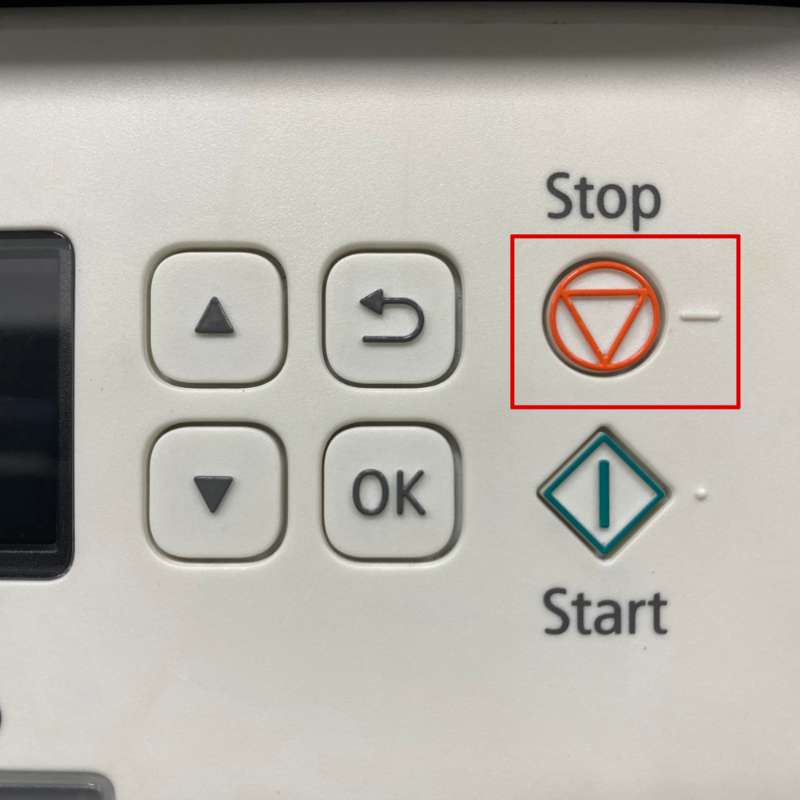
If your cartridge has stopped printing and has been printing well before, follow these steps to resolve the problem. To continue printing, press and hold the stop/reset button or the resume button for 10 seconds (Figure 1).
If you're encountering an error message stating that the ink cartridge can not be recognized, is an incompatible cartridge, the wrong ink cartridge is installed, or if your printer light has blinking lights, there may be an easy solution to fix the problem. Make sure that the cartridge pictured matches the cartridge you have in your hand or installed in your machine. The compatible ink cartridge model of the printer can be seen by opening the cover of the printer . Confirm that the printer you are using is listed in the printer compatibility table as a compatible printer for the cartridge you are trying to install. If One of these Two criteria do Not match, you have most likely received the incorrect ink cartridge for the printer. Please visit our Printer Compatibility page to determine what cartridge you need for your printer. After confirming that you have the correct cartridge for your printer, open the printer cover and remove the ink cartridge. After removing the cartridge, you will need to locate the copper contacts (Figure 1).
If the copper strip is missing, the cartridge will not work and will need to be replaced. If the copper strip is intact, you may need to clean the contacts from any kind of obstruction or debris as this could be the cause of the error. You can use a pencil eraser to clean the copper contacts. Brush the copper strip lightly with the eraser to remove any potential obstruction or debris. Or you can use any type of lint free cloth or a coffee filter to gently wipe the copper strip, again to remove any type of obstruction or debris. When all these done, replace the cartridge in the cradle, close the lid, and follow any prompts that may appear on the screen. If the problem persists after you put the cartridge back in the cradle, you need to reset the printer. This can be solved by turning off the computer and the printer with the cartridge installed. Unplug your printer and leave it off for 2 minutes. Restart the printer and computer, and try printing again. If you have tried both steps and got the same error, there is most likely an electrical problem with the cartridge and you should return the cartridge to where you purchased it. If you need to print right away and this troubleshooting did not resolve your ink cartridge problem, select the option entitled "One Cartridge Printing".
Some remanufactured cartridges come with a clip (Figure 1)
that protects the printhead and helps to preserve and maintain the quality of the cartridge. To remove this clip, please place the cartridge on a sturdy surface. Holding the clip with one hand, press down on the cartridge with the other hand and pull back on the clip. Some resistance is normal, so don't be alarmed. You may find some residual ink on the pad or some ink on the printhead of the cartridge. This is also normal, you can discard the removed protective cover. After removing the clip, you can install the cartridge in the printer as usual. If you need to print immediately and this troubleshooting did not resolve your ink cartridge problem, please select the option entitled "One Cartridge Printing".
If you have printed a document but are not satisfied with the print quality, you may need to perform a cleaning cycle to improve the print quality. You can clean through the control panel on your printer, if your printer does not have a control panel, select the "Perform a cleaning cycle from your computer" troubleshooting for further assistance. Please be awear that this process may vary by printer, and you can also check the printer's user manual for instructions on performing a cleaning cycle. Press the Menu button on the printer. Scroll to "Tools" and press "OK". Scroll to "Clean Printhead" and press "OK". After the cycle is complete, your printer will print a test page. If the quality of the test page is satisfactory, press "OK" to exit the cleaning cycle. You may return to the document you wish to print and resume printing. You may also perform another cleaning cycle if you are not satisfied with your test page. Please be aware that cleaning the printhead does consume ink;and therefore, it should only be done when necessary. If the test page is satisfactory, you can go back to the document you want to print and continue printing. If the test page is not satisfactory after the cleaning cycles, The next step is to try blotting the cartridge to make sure that the printhead nozzles are not clogged with dry ink. We recommend that you use a lint free cloth and place a paper towel or other absorbent material under the lint free cloth to protect your surface from the ink, which may stain your underlying surface. Remove the cartridge from the printer. Find the printhead. It's on the bottom of the cartridge. Do not touch the printhead or bottom of the cartridge, as this can damage the cartridge. Hold the ink cartridge with the printhead facing downward. Just press the printhead of the cartridge onto the lint free towel and hold for 3 seconds. After you lift the ink cartridge up, a smear should appear on the lint free cloth (Figure 1).
If you do get a good blot on the cloth, reinstall the cartridge and try printing again. If your cartridge does not provide a good blot, the ink may be completely depleted and you should replace your cartridge. If you need to print right away and this troubleshooting did not solve the problem with your cartridge, please select the option entitled "One Cartridge Printing".
If your cartridge has stopped printing and has been printing well before, follow these steps to resolve the problem. To continue printing, press and hold the stop/reset button or the resume button for 10 seconds (Figure 1).